书接上篇, 本篇我们来看看异步加载(code split).
示例项目:https://github.com/njleonzhang/deep-into-webpack-output-sample/tree/master/codesplit
我们还是使用一个简单的例子:
// const.js
export let name = 'leon'
export default function print() { console.log('print: ' + name) }
// test.js
export let testStr = 'I am test'
// index.js
import { testStr } from './test' // 同步加载

console.log(testStr)

import(/* webpackChunkName: "const" */ './const').then(Component => { // 异步加载
  Component.default()
  console.log(Component, Component.name)
})
// webpack
const path = require('path')
const HtmlWebpackPlugin = require('html-webpack-plugin')

module.exports = {
  mode: 'development',
  entry: {
    index: './index.js'
  },
  output: {
    filename: '[name].bundle.js',
    chunkFilename: '[name].bundle.js',
    path: path.resolve(__dirname, 'dist')
  },
  devtool: 'cheap-module',
  plugins: [
    new HtmlWebpackPlugin({
      filename: 'index.html',
      inject: true
    })
  ],
}
接着我们来观察编译后的输出文件:
|__ index.bundle.js   // 入口 `index.js` 和 同步模块 `test.js`
|__ 0.bundle.js       // 异步模块 const 的代码
index.js 里的大多数代码我们都是熟悉的,主要是前几篇里我们介绍过的对同步模块的处理,多出的内容就是关于异步模块的处理,我们截取这段代码来看:
"./index.js":
(function(module, __webpack_exports__, __webpack_require__) {
  "use strict";
  __webpack_require__.r(__webpack_exports__);
  // 同步模块的处理
  var _test__WEBPACK_IMPORTED_MODULE_0__ = __webpack_require__("./test.js");
  console.log(_test__WEBPACK_IMPORTED_MODULE_0__["testStr"])

  // 异步模块的处理
  __webpack_require__.e("const").then(__webpack_require__.bind(null, "./const.js")).then(Component => {
    Component.default()
    console.log(Component, Component.name)
  })
})
这里出现了一个我们没有见过的新的方法: __webpack_require__.e, 我们看一下它的一些相关实现:
// object to store loaded and loading chunks
// undefined = chunk not loaded, null = chunk preloaded/prefetched
// Promise = chunk loading, 0 = chunk loaded
// 用于存储已加载和加载中的 chunk, 异步模块在 webpack 中被称为 chunk
var installedChunks = {
  "index": 0
};

// webpack_require 的定义
__webpack_require__.e = function requireEnsure(chunkId) {
  // 声明一个队列,此队列与此 chunk 绑定。
  var promises = [];

  // JSONP chunk loading for javascript
  // 拿到该 chunk 对应的值, 我们这个调用中,显然 installedChunks 里没有
  // const 这个 chunk,所以 installedChunkData 就是 undefined
  var installedChunkData = installedChunks[chunkId];
  if(installedChunkData !== 0) { // 0 means "already installed".

    // a Promise means "currently loading".
    // 如果正在加载
    if(installedChunkData) {
      promises.push(installedChunkData[2]);
    } else {
      // 如果没有加载,(本例的场景), 构造一个 Promise 代表此异步模块的加载结果,并以
      // [resolve, reject, Promise] 这样的结构来存储
      // setup Promise in chunk cache
      var promise = new Promise(function(resolve, reject) {
        installedChunkData = installedChunks[chunkId] = [resolve, reject];
      });
      // 将构造的这个 promise 加入队列
      promises.push(installedChunkData[2] = promise);

      // start chunk loading
      // 开始加载 chunk,通过在页面里插入一个 script 标签来做
      var script = document.createElement('script');
      var onScriptComplete;

      // 设置编码方式
      script.charset = 'utf-8';
      // 设置超时时间
      script.timeout = 120;

      // 如果启用了 CSP 教研,则设置 nonce 属性
      if (__webpack_require__.nc) {
        script.setAttribute("nonce", __webpack_require__.nc);
      }

      // 拼接 chunk 文件的服务器地址
      script.src = jsonpScriptSrc(chunkId);

      // 定义加载完成的处理函数
      onScriptComplete = function (event) {
        // 加载结束了
        // avoid mem leaks in IE.
        script.onerror = script.onload = null;
        // 有结果了,所以清除加载超时的定时器
        clearTimeout(timeout);
        // 读出 chunk 的结构
        var chunk = installedChunks[chunkId];
        if(chunk !== 0) {
          if(chunk) {
            var errorType = event && (event.type === 'load' ? 'missing' : event.type);
            var realSrc = event && event.target && event.target.src;
            var error = new Error('Loading chunk ' + chunkId + ' failed.\n(' + errorType + ': ' + realSrc + ')');
            error.type = errorType;
            error.request = realSrc;
            chunk[1](error); // 这里调用的错误处理函数,也就是说这里没有加载成功的处理。
          }
          installedChunks[chunkId] = undefined;
        }
      };
      // 设置超时的处理
      var timeout = setTimeout(function(){
        onScriptComplete({ type: 'timeout', target: script });
      }, 120000);
      script.onerror = script.onload = onScriptComplete;
      document.head.appendChild(script);
    }
  }
  return Promise.all(promises);
};
这段逻辑总体不难理解,大家可以对照注释来看很容易理解。我总结一下, webpack 为每一个异步模块都分配了一个 id,并维护了一个全局对象 installedChunks 用于存放异步加载模块的信息,其结构为:
{
  index: 0,
  [id: string]: any
}
id 对应的值有多种形式:
undefined: 未加载null: preloaded 或 prefetched 的模块,可参考文档进一步了解- 数组: 结构为
[resolve Function, reject Function, Promise]的数组, 代表 chunk 在处于加载中.Promise代表这个加载行为,resolve Function 和 reject Function 分别可以 resolve 和 reject 这个Promise 0: 已加载
我们的这个简单场景中,const 模块的 id 为 const, __webpack_require__.e 首先为它在 installedChunks 里添加了一个数组:
  {
    index: 0,
    const: [resolve Function, reject Function, Promise]
  }
接着为 const.js 模块创建了一个 srcipt 标签, src 设置为 const.js 的网络地址,接着把这个 script 被插入到了页面的 head 里, 用于加载此模块。这都好理解,奇怪的地方是 __webpack_require__.e 里并没有加载成功的处理代码,只有加载错误的处理代码。那么加载成功的代码在哪呢?
可以发现 webpack 启动代码里多了这么几行:
  // 初始化 window.webpackJsonp 这个对象
  var jsonpArray = window["webpackJsonp"] = window["webpackJsonp"] || [];
  // 暂存 JsonArray 的 push 方法
  var oldJsonpFunction = jsonpArray.push.bind(jsonpArray);
  // 修改 JsonArray 的 push 方法为一个叫 webpackJsonpCallback 的函数
  jsonpArray.push = webpackJsonpCallback;
  // 把 jsonpArray 做一份拷贝
  jsonpArray = jsonpArray.slice();
  // 遍历 jsonpArray 对其各项调用 webpackJsonpCallback 函数
  for(var i = 0; i < jsonpArray.length; i++) webpackJsonpCallback(jsonpArray[i]);
  var parentJsonpFunction = oldJsonpFunction;
jsonpArray.push = webpackJsonpCallback; 这一行实际上给 window["webpackJsonp"] 这个变量添加了一个 push 方法, window["webpackJsonp"] 是个数组,也就是说 window["webpackJsonp"] 这个数组的 push 函数被复写成了 webpackJsonpCallback.
我们前面说到 const.js 模块被加载到了页面里了。那么加载成功后,其代码也就自然执行了。
// const.js
(window["webpackJsonp"] = window["webpackJsonp"] || []).push([["const"],{
  "./const.js":
  (function(module, __webpack_exports__, __webpack_require__) {
    "use strict";
    __webpack_require__.r(__webpack_exports__);
    __webpack_require__.d(__webpack_exports__, "name", function() { return name; });
    __webpack_require__.d(__webpack_exports__, "default", function() { return print; });
    let name = 'leon'
    function print() { console.log('print: ' + name) }
  })
}]);
我们会惊奇的发现,原来模块加载正常的处理逻辑在这里, window["webpackJsonp"] 的 push 方法 (webpackJsonpCallback) 被调用了。
那么 webpackJsonpCallback 又干了什么呢?其定义在 index.bundle.js 里。
function webpackJsonpCallback(data) {
  var chunkIds = data[0];    // 取出模块的 id
  var moreModules = data[1]; // 取出模块

  // 标记所有 chunk 为已加载
  var moduleId, chunkId, i = 0, resolves = [];
  for(;i < chunkIds.length; i++) {
    chunkId = chunkIds[i];
    if(installedChunks[chunkId]) {
      resolves.push(installedChunks[chunkId][0]); // 前文中提到的 resolve Function
    }
    installedChunks[chunkId] = 0; // 并标记所有 chunk 为已加载
  }

  // 把所有的模块加入 modules 的对象中, 没错就是 __webpack_require__.m 对应的那个属性
  for(moduleId in moreModules) {
    if(Object.prototype.hasOwnProperty.call(moreModules, moduleId)) {
      modules[moduleId] = moreModules[moduleId];
    }
  }

  // 执行一下原来的 push 函数
  if(parentJsonpFunction) parentJsonpFunction(data);

  // resolve 此模块的 chunk 对应的 Promise.
  while(resolves.length) {
    resolves.shift()();
  }
};
所以一切就明朗啦,模块加载成功后,模块内部代码执行, webpackJsonpCallback 函数的执行会把模块的内容被插入到 __webpack_require__.m 中,并 resolve 此模块加载的 Promise。就这样异步模块和同步模块一样, 被加载到了 __webpack_require__.m 这个对象中了,接着只需要对其调用 __webpack_require__ 函数就可以按照同步模块的 load 流程进行初 load 了。在看一眼异步模块加载的这句代码:
// 异步模块的处理
__webpack_require__.e("const").then(__webpack_require__.bind(null, "./const.js")).then(Component => {
  Component.default()
  console.log(Component, Component.name)
})
果然看到了 __webpack_require__ 的身影了。
最后我来上个整体的流程图:
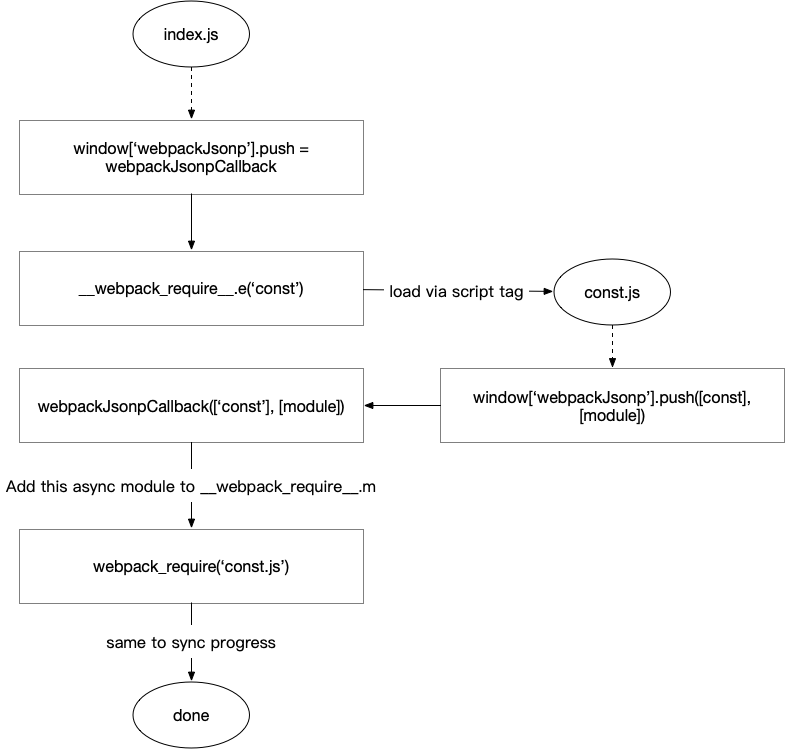
入口 js 执行后,把 window["webpackJsonp"] 的 push 方法被 hook 成了 webpackJsonpCallback, 接着通过调用 __webpack_require__.e 函数利用 script 标签把异步模块加载进浏览器. 异步模块的代码开始执行, 它调用 window["webpackJsonp"].push 方法把自己的塞到了 __webpack_require__.m 里, 余下就和同步模块的流程一样了。